Appearance
Cloud Agents on AWS
Run an experiment on an EC2 instance by choosing a host tag for the hardware you need. SystemsLab launches the instance, runs the job, and terminates the instance when it finishes.
- Run an experiment using an available instance type.
- Add an instance type when the hardware you need is missing.
- Set up AWS provisioning for a SystemsLab server.
- Troubleshoot a run that is stuck or failing.
Run an Experiment on AWS
You need the CLI configured for your server. Open /admin/infra in the web UI to see the available virtual tags and their EC2 instance types. A virtual tag is the name you put in host.tags to request a cloud instance. For example, a deployment might offer ec2-c7i-large for c7i.large instances.
Use a tag listed on your server; the name below is an example. If the instance type you need is missing, add a virtual tag. If AWS provisioning is not configured yet, a server administrator needs to set it up first.
Save this as ec2-smoke.jsonnet, replacing ec2-c7i-large with your tag:
jsonnet
local systemslab = import 'systemslab.libsonnet';

{
  name: 'ec2-smoke',
  jobs: {
    bench: {
      host: { tags: ['ec2-c7i-large'] },
      steps: [
        systemslab.bash('nproc; systemslab-agent --version'),
      ],
    },
  },
}
Submit it and follow its output:
bash
systemslab submit ec2-smoke.jsonnet --tailThe job waits for an instance to boot before its steps run. Each cloud agent runs one job, then exits; SystemsLab terminates the instance afterward. To use cloud hardware in an existing experiment, set its job's host.tags the same way. Use one virtual tag per job.
If your deployment requires manual approval, an operator must approve the request on /admin/infra or with systemslab infra approve before the instance launches.
Check Cost and Limit Instance Count
Check the current prices for the instance type behind your tag:
bash
systemslab infra pricing --instance-type c7i.largeFor an experiment you have run before, estimate its cost using past run durations:
bash
systemslab infra estimate --experiment-name ec2-smoke --host-count 1 --instance-type c7i.largeYou can also check that estimate when submitting. Specify the instance type behind your tag; without --instance-type, the check includes every instance type the deployment has ever priced:
bash
systemslab submit ec2-smoke.jsonnet --budget 5 --host-count 1 --instance-type c7i.largeThe CLI refuses submission if the on-demand estimate exceeds the budget or cannot be calculated, including when there is no run history yet. This checks an estimate before submission; it does not stop a running experiment at a spending limit. See budget checks for details.
To limit concurrent instances across experiments, create a context and submit into it:
bash
systemslab context new --name aws-run --max-instances 2 --output-format short
systemslab submit ec2-smoke.jsonnet --context <context-id> --tail
Use the ID returned by context new. Requests beyond the context's limit wait for capacity. systemslab infra status shows running instances, the current burn rate, and today's spend.
Add an Instance Type
Create a virtual tag to make an EC2 instance type available to experiments. You can do this in the web UI without restarting the server.
You need an existing launch profile and an AMI compatible with the instance type's architecture. The launch profile supplies the network and IAM settings. Ask your server administrator for the profile and AMI to use; if either is missing, follow server setup.
For example, to offer c7i.large instances:
- Open
/admin/infraand click New virtual tag. - Name it
ec2-c7i-large. This is the name experiments will use inhost.tags; it cannot be renamed later. Choose a name that no existing agent advertises, or jobs may run on that agent instead. - Choose the launch profile, enter the AMI ID, and set the instance type to
c7i.large. An AMI for this type must use the amd64 architecture. - Set the market to
ondemandfor the first run and choose a Max instances limit for this tag. After testing, you can switch toautoto allow spot capacity according to the deployment's duration and host-count limits. - Click Check with AWS. It checks the AMI's availability, owner and architecture, and whether the instance type is offered in the region. Resolve any reported errors.
- Enter a Comment explaining what the tag is for and your name or email in Acting as, then click Create tag.
- Run the example experiment with your new tag.
The completed form looks like this. The AMI, account and network IDs are examples; use your deployment's values. The optional limits are filled in to show where they go. Spot settings apply when you choose spot or auto.
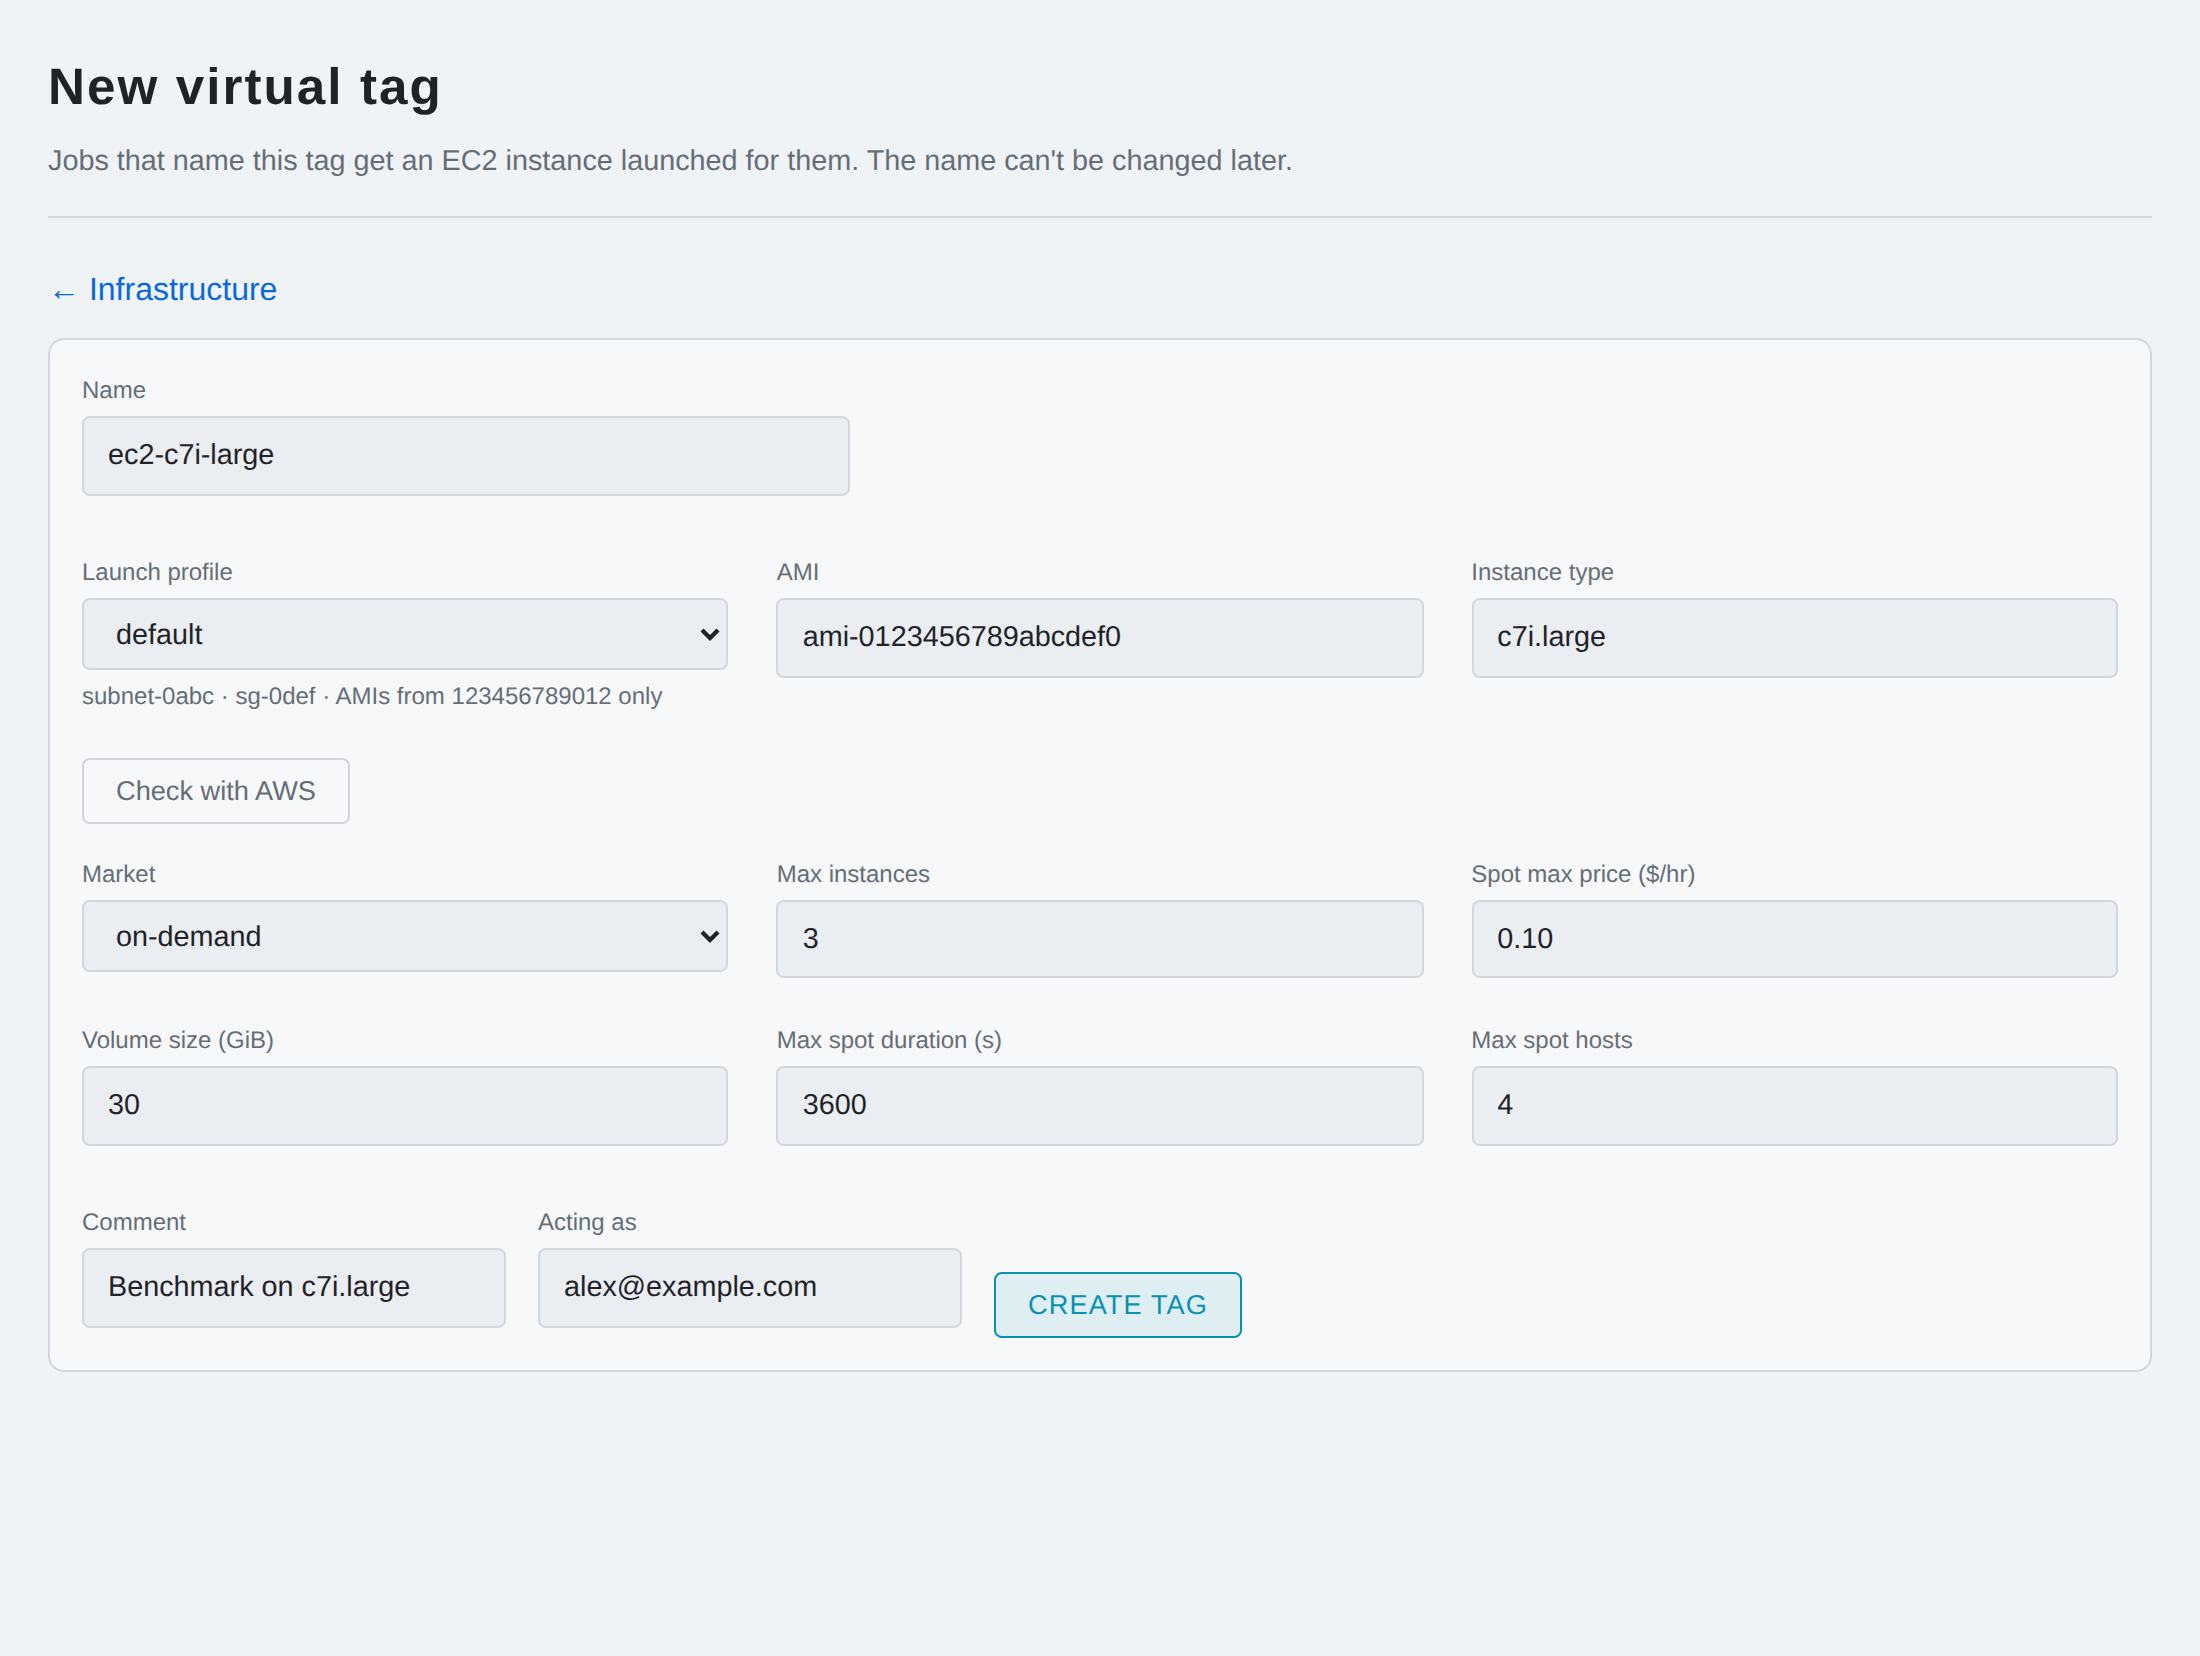
The server checks the settings again when you save. If the instance type or AMI owner is not allowed by the server configuration, ask the administrator to update it. Those configuration changes need a server restart.
These optional settings let you adjust the tag for your experiments:
| Setting | When to change it |
|---|---|
| Market | Use spot to request spot capacity, ondemand for on-demand, or auto to let the server choose. |
| Spot max price | Set a maximum spot price in USD per hour. Defaults to the on-demand price. |
| Volume size | Increase root disk space, in GiB. Must be at least the AMI's snapshot size. |
| Max spot duration, max spot hosts | Override the deployment's limits for choosing spot capacity with auto. |
| Setup script | A script run as root on each instance before the agent starts, such as one that installs your benchmark. See setup scripts. |
Edit a tag from its page on /admin/infra. For example, after your first test, change Market to auto, enter a comment and your name in Acting as, then click Review changes. Check the proposed change and click Save.
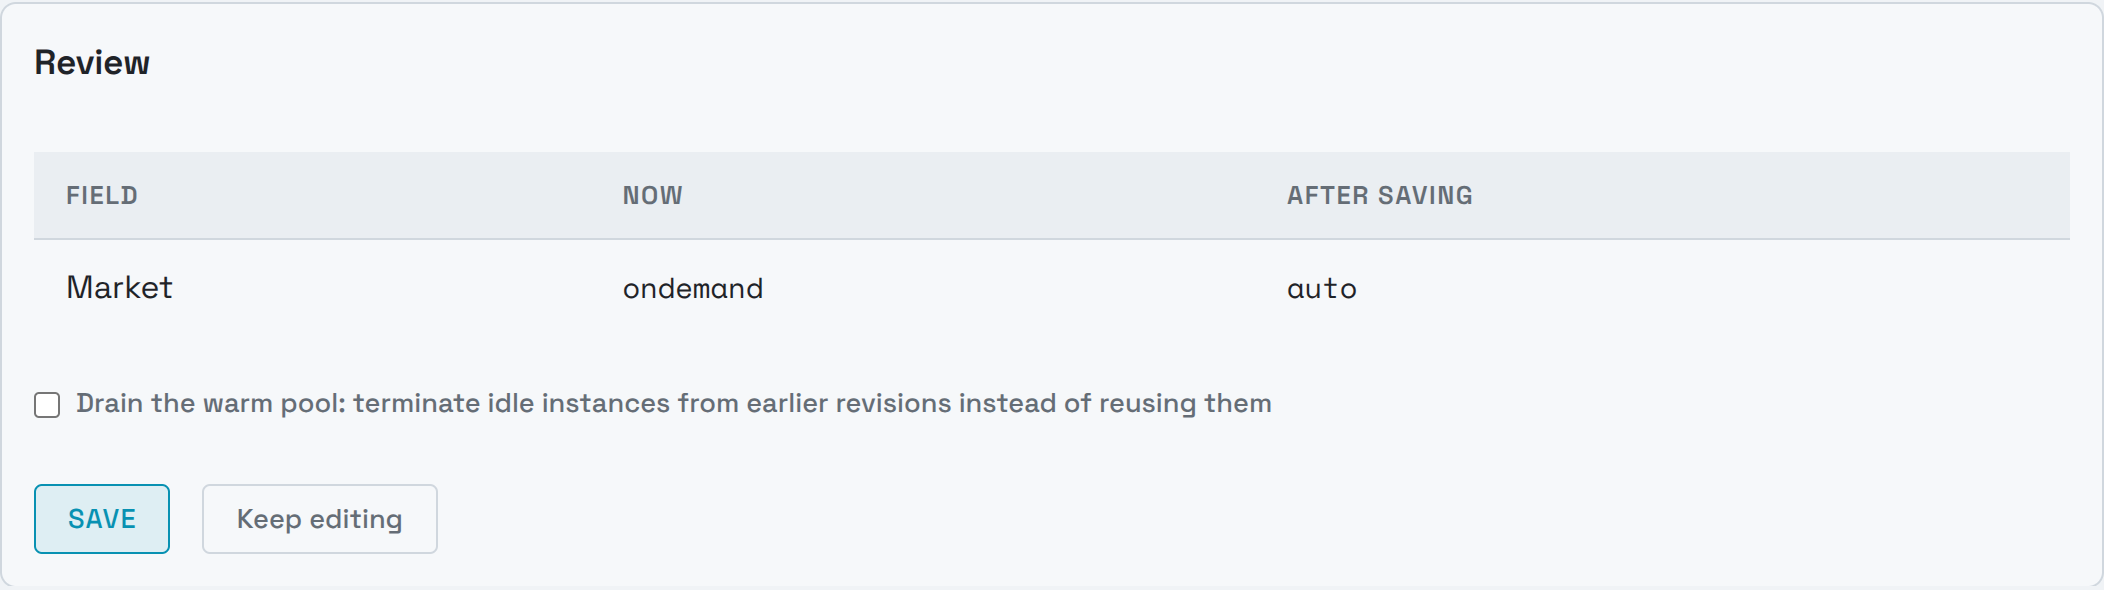
Changes take effect on the server's next reconcile pass without a restart. The page keeps a revision history so you can roll back a change. Disable a tag to prevent new requests for it; its name and history are kept.
Set Up AWS Provisioning
This section is for the administrator of an existing SystemsLab server. You will give the server AWS credentials, configure networking, choose an AMI, and add a launch profile. Only the controller server provisions instances, and each deployment uses one AWS region.
Give the Server AWS Credentials
The server loads AWS credentials from the standard AWS provider chain. If the server runs on EC2, an instance profile is the simplest option. Otherwise use AWS_ACCESS_KEY_ID/AWS_SECRET_ACCESS_KEY or AWS_PROFILE in the server's environment.
The server needs the permissions below. TerminateInstances is limited to instances that carry the systemslab:managed=true tag, which the server sets on every instance it launches. This policy grants termination permission only for managed instances.
json
{
  "Version": "2012-10-17",
  "Statement": [
    {
      "Sid": "Launch",
      "Effect": "Allow",
      "Action": "ec2:RunInstances",
      "Resource": "*"
    },
    {
      "Sid": "TagAtLaunch",
      "Effect": "Allow",
      "Action": "ec2:CreateTags",
      "Resource": "*",
      "Condition": { "StringEquals": { "ec2:CreateAction": "RunInstances" } }
    },
    {
      "Sid": "TerminateManaged",
      "Effect": "Allow",
      "Action": "ec2:TerminateInstances",
      "Resource": "*",
      "Condition": {
        "StringEquals": { "aws:ResourceTag/systemslab:managed": "true" }
      }
    },
    {
      "Sid": "Describe",
      "Effect": "Allow",
      "Action": [
        "ec2:DescribeInstances",
        "ec2:DescribeSpotInstanceRequests",
        "ec2:DescribeSpotPriceHistory",
        "ec2:DescribeImages",
        "ec2:DescribeInstanceTypes",
        "ec2:DescribeInstanceTypeOfferings",
        "pricing:GetProducts"
      ],
      "Resource": "*"
    }
  ]
}
If a launch profile sets instance_profile, also grant iam:PassRole on that role.
To use an instance profile, create a role that EC2 can assume, attach the policy, and associate the profile with the server's instance:
bash
aws ec2 associate-iam-instance-profile \
    --instance-id <server-instance-id> \
    --iam-instance-profile Name=<profile-name>
The server reads instance-profile credentials from the instance metadata service on its next AWS call, so attaching the profile does not need a server restart.
WARNING
If the server runs inside a container on the instance, raise the instance's metadata hop limit to 2, or the container cannot reach IMDSv2:
bash
aws ec2 modify-instance-metadata-options \
    --instance-id <server-instance-id> --http-put-response-hop-limit 2
Set Up Networking
Traffic must flow both ways between the server and the instances:
- Instance to server. The agent connects to the server's
server_urlto register and fetch work. The URL must resolve and route from inside the subnet the instances launch into. A private IP or internal DNS name works;localhostdoes not. The server's port defaults to 3000. - Server to instance. During registration the server connects back to the agent on TCP port 1427. The instances' security group must allow inbound 1427 from the server. Without it, every launch ends in
registration_timeout.
If you need SSH access for debugging, allow inbound port 22 from your own network and set a key pair in the launch profile.
TIP
A subnet belongs to exactly one availability zone, so the launch profile's subnet_id decides where instances run. Use a subnet in the server's zone, and the same one in every profile, to keep all of an experiment's instances in one zone. A profile without subnet_id lets EC2 pick a subnet in any zone of the default VPC. SystemsLab does not use placement groups.
Choose an AMI
Instances boot from the AMI each virtual tag names, and cloud-init sets them up from the user-data the server sends. Any AMI works if it has:
- cloud-init, which runs the user-data as root (stock Debian, Ubuntu, Amazon Linux and Rocky Linux images have it);
- IMDSv2 (the bootstrap does not fall back to IMDSv1);
apt-getordnf, used to install the agent, andcurlandjqif they are missing;- outbound access to the public SystemsLab package repositories, unless the AMI already has the agent.
Use the official image for one of the supported distros, for the architecture of the instance types you plan to use. No repository credentials are needed: the agent packages are public.
On boot, the instance's bootstrap:
- Installs the latest release of
systemslab-agentfrom the public SystemsLab repositories, as the setup page describes. If the AMI already has the agent, this step is skipped and the AMI's agent is used. - Runs the virtual tag's setup script, if it has one.
- Starts the agent.
The agent runs without a config file, so it uses no process isolation (isolation_strategy = "none"). Each instance runs a single job and is then terminated, so leaked processes cannot reach a later run.
The repositories stay configured, so a setup script can also install rezolus or other public SystemsLab packages. To skip the install at boot, or if instances cannot reach the repositories, bake the agent into the AMI.
Customize Instances with a Setup Script
Install the tools your experiments need with a virtual tag's Setup script instead of building them into the AMI. The script runs as root after the agent is installed and before it starts. A script without a #! line runs under bash. For example:
bash
#!/bin/bash
set -euo pipefail
apt-get install -y rezolus fio
If the script exits with an error, the agent does not start, the instance never registers, and the server terminates it at registration_timeout. The script's output is in /var/log/cloud-init-output.log on the instance. Scripts can be up to 16 KiB. Editing a tag's script is a change to what the tag launches, so it drains the tag's warm pool by default.
Bake the Agent into an AMI
An AMI that already has systemslab-agent boots without installing anything, and its instances run the agent it has. Disable the packaged systemslab-agent.service: the bootstrap starts the agent itself, and a second agent would try to register the same host.
The steps below start from a stock Debian image.
Launch a Builder Instance
Launch a small instance from the latest official Debian AMI for the architecture your instance types use: a t3.micro for amd64, or a t4g.micro for arm64 (Graviton). Give it an SSH key and a security group that allows SSH. Then log in as admin.
Install the Agent
Follow the setup page as far as installing systemslab-repo. The agent packages are public, so skip setup-repo.sh: the image needs no repository credentials. Then install the agent and its dependencies, and disable the packaged service:
bash
sudo apt-get install -y systemslab-agent rezolus curl jq
sudo systemctl disable --now systemslab-agent.service
The bootstrap never upgrades a baked agent, so rebuild the image to pick up a new agent release.
WARNING
AMIs built from earlier versions of this guide carry the private repository's credentials, in /etc/apt/keyrings/gcp/credentials.json, which anyone with root on an instance or a copy of the AMI can read. Rebuild them without running setup-repo.sh.
Generalize and Create the Image
Remove the state that must be unique to each instance. cloud-init regenerates the SSH host keys and machine ID on the first boot of every new instance.
bash
sudo apt-get clean
sudo cloud-init clean --logs --seed
sudo rm -f /etc/ssh/ssh_host_*
sudo truncate -s0 /etc/machine-id
sudo rm -f /var/lib/dbus/machine-id
TIP
cloud-init clean leaves the builder's ~/.ssh/authorized_keys in place, so the builder's SSH key keeps working on every instance launched from the AMI, even when a launch profile sets no key_name. Remove that file too if you do not want this.
Stop the builder from the AWS side, create the image, and terminate the builder once the image is available:
bash
aws ec2 stop-instances --instance-ids <builder-id>
aws ec2 wait instance-stopped --instance-ids <builder-id>
aws ec2 create-image --instance-id <builder-id> \
    --name systemslab-agent-debian-13-<arch>-<yyyymmdd>
aws ec2 wait image-available --image-ids <ami-id>
aws ec2 terminate-instances --instance-ids <builder-id>
Replace <arch> with amd64 or arm64 to match the builder, so the image is not later picked for an instance type of the other architecture.
Configure the Server
Add an [infra] section to the controller's server config, with one [infra.launch_profiles.<name>] table per network and IAM setup, then restart the server. Most deployments need only one profile.
toml
[infra]
region     = "us-west-2"
server_url = "http://10.0.1.20:3000"   # reachable from inside the subnet

allocation           = "auto"   # "manual" to approve each launch
global_max_instances = 3        # keep it small while testing
allowed_regions      = ["us-west-2"]

[infra.launch_profiles.default]
subnet_id            = "subnet-0abc"
security_group_ids   = ["sg-0def"]
key_name             = "my-key"          # optional, for SSH
allowed_image_owners = ["123456789012"]  # your AWS account id
WARNING
Anyone who can edit virtual tags chooses the AMI that runs inside your subnet and security group. Set allowed_image_owners to your own account id so that only AMIs owned by that account can be used.
[infra] Options
| Option | Default | Description |
|---|---|---|
region | required | The one AWS region this server launches into. |
server_url | required | The URL instances use to reach the server. |
allocation | "auto" | "manual" holds every new launch until an operator approves it. |
global_max_instances | 50 | Cap on instances up at once, across all tags. |
registration_timeout | 600 | Seconds to wait for a launched instance's agent to register. |
idle_ttl | 600 | Seconds an idle instance is kept for reuse before it is terminated. It has no effect on the instances in this guide: their agents run one-shot (--environment=ec2) and the instance is terminated after its first job. |
instance_identity_certificate | unset | AWS's PEM-encoded RSA certificate for instance identity documents in region. When set, each EC2 agent must present its instance's signed identity document at registration. See instance identity. |
reconcile_interval | 30 | Seconds between the manager's reconcile passes. |
dead_host_grace | 900 | Seconds to wait for an EC2 agent whose host was declared lost to register again before terminating its instance. Only applies when instance_identity_certificate is set. |
max_spot_duration | 3600 | Runs expected to take longer than this many seconds use on-demand. |
max_spot_hosts | 4 | Launches bigger than this many hosts use on-demand. |
allowed_instance_types | [] | If not empty, virtual tags can use only these instance types, and launches of any other type are denied. If empty, any instance type is allowed. |
allowed_regions | [] | If not empty, the server refuses to start when region is not listed. |
Set allowed_instance_types to restrict which EC2 types users can add. An empty list allows any type. Updating this list needs a server restart.
Verify Instance Identity
Every instance in a launch shares one registration token, so by default anyone who reads the token off one instance could register as another instance of the same launch. Set instance_identity_certificate to make the server check each agent's signed EC2 instance identity document instead. The document must name the instance, the region and the address the agent registers from.
Use the RSA certificate for your region from the EC2 user guide's "AWS public certificates for instance identity document signatures":
toml
[infra]
instance_identity_certificate = """
-----BEGIN CERTIFICATE-----
...
-----END CERTIFICATE-----
"""
The server refuses to start if the certificate cannot be parsed. Once it is set, the agent on your AMI must be from release 165.0.0 or later.
The certificate also lets an instance recover from a lost host. If a status check fails and the server declares the host lost, the agent registers again into its old host row instead of the instance being terminated. The server waits dead_host_grace seconds for this before terminating the instance. Instances bound to a single run, hosts lost while locked, and spot instances warned of an interruption are still terminated straight away.
Launch Profile Options
| Option | Description |
|---|---|
subnet_id | The subnet to launch into. It also decides the availability zone. |
security_group_ids | Security groups for the instances (see networking). |
key_name | An EC2 key pair to allow SSH with. |
instance_profile | An IAM instance profile ARN for the instances. Needs iam:PassRole. |
allowed_image_owners | AWS account ids whose AMIs virtual tags using this profile may launch. If empty, any AMI is allowed. |
Verify the Setup
Restart the server after saving its configuration, then create a virtual tag using your AMI and launch profile. Use ondemand for the first test.
Check that the infrastructure manager is running and pricing is available:
bash
systemslab infra status
systemslab infra pricing --instance-type c7i.large
Pricing refreshes in the background after you create the tag, so it may take a few reconcile intervals to appear. Then submit the example experiment. Confirm that its output arrives and that the instance is terminated after the job finishes.
Troubleshooting
Start with the request status and event log:
bash
systemslab infra requests
systemslab infra log
infra log lists events newest first. A successful run goes through requested, launch_submitted, launched, registered, assigned, and released, followed by termination.
| Symptom | Likely cause |
|---|---|
The job stays queued and infra requests shows nothing | The server has no [infra] section, no virtual tag with that name exists, or the job names more than one virtual tag. |
| A request is denied | systemslab infra requests shows the reason: the tag is disabled, its launch profile is not in the server config, or its instance type is not in allowed_instance_types. |
Check with AWS reports UnauthorizedOperation | The server is missing ec2:DescribeImages, ec2:DescribeInstanceTypes, or ec2:DescribeInstanceTypeOfferings. |
A request stays pending | A cap is full: check systemslab infra log --event waiting_capacity_cap --event waiting_context_cap. |
launch_failed repeats | The event's details have the AWS error. Permanent errors (a bad AMI, an unsupported instance type, a missing subnet or security group, or a setup script too large to fit in EC2's 16 KB user-data even compressed) deny the request. Others, including quota errors such as InstanceLimitExceeded or VcpuLimitExceeded, leave the request open and are retried with backoff. |
registration_timeout | See below. |
| The server refuses to start | region is not in allowed_regions, or instance_identity_certificate is not a valid PEM certificate. |
Prices stay unknown | The pricing refresh is failing: check pricing:GetProducts, ec2:DescribeSpotPriceHistory, and outbound access to the pricing endpoint. |
When an instance does not register in time, the server terminates it. To debug, launch again and log in to the instance while it is still up:
/var/log/cloud-init-output.loghas the bootstrap's output, including the agent install and the setup script. A failed package install or a setup script that exited with an error shows up here./etc/systemslab-agent/environment.jsonshould have the rightserver_url, aninstance_id, and theidentity_documentandidentity_signaturethe server checks wheninstance_identity_certificateis set.curl -X POST <server_url>/api/v1/ping -H 'SystemsLab-HealthCheck: 1'from the instance checks that it can reach the server.- If the agent reached the server but registration failed, the server log has the reason.
AgentUnreachablemeans the server could not connect back on port 1427.